Salesforce Packaged Integration
Install and configure the Poggio managed package for Salesforce to bring account intelligence, POVs, and account plans directly into your CRM and Agentforce workflows.
Install on AgentExchange
Overview
The Poggio Salesforce Package is a managed AgentExchange package that brings Poggio's account intelligence directly into Salesforce. It distributes Poggio-generated POVs, account plans, and deep research into the surfaces where revenue teams already work, without replacing any existing tools or workflows.
The package connects Poggio's intelligence engine to Salesforce through native objects, flow actions, and Agentforce integrations, built on Salesforce's recommended External Client Application pattern. Once installed, your team gets access to tailored, real-time account insights inside Salesforce, powered by the same Superagent that drives Poggio's web app and Slack integration.
This package is a joint solution leveraging the best of Poggio and Salesforce as a distribution of intelligence to every surface where revenue work happens.
How it works
Something changes
- Opportunity stage change
- Gong call recorded
- New email or note
- Account becomes interesting
Deep research
Poggio builds an external POV using public signals, filings, news, and market data. Results are cached and scored.
Build the plan
- Account Plan
- Account Objectives
- Contact records
Notify seller
Seller is pinged in Slack to review, refine via Agentforce, and take action.
At the core of the integration are Salesforce Flows. Every step in the diagram above is orchestrated through native Flow actions, which means IT and RevOps admins have complete control over the data flow, trigger conditions, frequency, and business logic. There is nothing proprietary or opaque about how the package operates. You configure it using the same Flow Builder your team already knows, and you can customize, extend, or replace any template to fit your process. It's a seamless fit into your existing Salesforce governance model: high value, low effort.
The package supports two primary workflows:
- Account POV generation: Automatically or manually trigger Poggio to build an external POV for any account, with results written back to a Poggio Account Intel record in Salesforce
- Account Plan creation: Trigger Poggio to generate or update Account Plan records, along with Account Objectives and Contacts, based on current account state and POV data
What it unlocks
For sellers
Everything about how you sell stays the same. You keep your CRM workflow, your pipeline, your process. What changes is that you now have Poggio's deep account intelligence available right on the Account record in Salesforce. No tab-switching, no separate login.
- POV summaries and top themes visible directly on Account page layouts
- POV strength scoring (low, medium, high) to help prioritize outreach
- Ask Poggio via Agentforce to get real-time, grounded answers about any account
- Account plans generated and kept up to date automatically
- Account objectives maintained alongside each plan to keep strategy focused
- Contacts populated with seniority, department, and labels so they appear in the Relationship Map
For RevOps and IT
You get full control over how Poggio intelligence flows into your Salesforce org. The package is built on standard Salesforce primitives (custom objects, invocable Apex actions, flow templates), so it fits into your existing automation and governance model.
- Setup Assistant walks through installation in minutes, not hours
- Permission sets for admins, integration users, agent users, and standard users
- Flow actions and templates you can customize or extend with Flow Builder
- Package logging with configurable log levels and retention limits
- System Connections panel for managing the Poggio-Salesforce authentication
For sales leadership
Your team's existing reports, dashboards, and pipeline management stay exactly as they are. The package adds a layer of account intelligence that helps reps prioritize the right accounts and show up better prepared.
- POV fit scoring across accounts for territory and pipeline prioritization
- Account plans, objectives, and relationship maps that stay current as new information surfaces
- Consistent intelligence across every surface: what a rep sees in Salesforce matches what they see in Poggio, Slack, and the Superagent
Package contents
The Poggio Salesforce integrated solution ships as two installable packages: a Core Package and an optional Agentforce Extension Package.
Core package
Custom objects
| Object | Purpose |
|---|---|
| Poggio Account Intel | Stores the POV for each account. Includes POV summary, top themes, strength score, strength rationale, and a link back to the Poggio account. Linked to the standard Account object. |
| Account Objective | Stores objectives tied to an Account Plan. Each objective captures a specific strategic goal for the account. |
| Contact | Poggio creates and maintains Contact records with seniority, department, and labels so they populate within the Relationship Map on the Account record. |
| Poggio Sync Request | Tracks each request sent to Poggio (create or refresh), including status, request type, and timestamps. Used for monitoring and troubleshooting. |
| Setup Data | Stores configuration state for the package: system tokens, encryption keys, and logging preferences. |
| Package Log | Stores debug and error log records created by the package. Viewable from a custom tab. |
Flow actions
The package includes invocable Apex actions that can be used in any Salesforce Flow:
| Action | What it does |
|---|---|
| Generate POV with Poggio | Sends an Account ID to Poggio to initiate POV creation. Poggio researches the account asynchronously and writes results back to the Poggio Account Intel record via the Salesforce REST API. |
| Regenerate POV with Poggio | Re-triggers POV generation for an account that already has a Poggio Account Intel record. Use this to refresh stale data or react to new information. |
| Create Account Plan with Poggio | Sends account and plan metadata to Poggio to generate or update an Account Plan, its Account Objectives, and associated Contacts in your org. |
Flow templates
The package ships with three flow templates that you can activate as-is or clone and customize:
| Template | Trigger | What it does |
|---|---|---|
| Generate POV | Opportunity stage set to "Prospecting" (for example) | Finds the parent Account, checks for an existing Poggio Account Intel record, and triggers POV creation. Also includes a scheduled daily intelligence cache regeneration if older than 45 days. |
| Refresh Poggio Account Intel | Scheduled or manual | Re-runs POV generation for stale Poggio Account Intel records to keep account intelligence current. |
| Generate Account Plan | Poggio Account Intel status set to "Success" | Finds the related Account, checks for existing Account Plan records, and triggers creation or update of the Account Plan, Account Objectives, and Contacts via Poggio. |
Flow templates are starting points. Clone and customize the trigger criteria, add conditions, or incorporate the flow actions into your own existing flows using Flow Builder.
Setup Assistant
A guided setup experience built into the package. After installation, the Setup Assistant walks admins through:
- Account Plan Object Configuration: Select the Salesforce object your org uses to manage Account Plan records
- System Connections: Configure the bidirectional authentication between Poggio and Salesforce, including Domain Settings, the Outbound Connection (Salesforce → Poggio), and the Inbound Connection (Poggio → Salesforce) with a dedicated Integration User and External Client App
- Agent Configuration: Create the Agentforce agent and add the bundled Poggio subagent (requires the Agentforce Extension Package)
- Package Log Settings: Enable or disable logging, choose log level (Errors Only or All Activity), set maximum log retention (1,000 / 5,000 / 10,000 records), and bulk-delete logs
Permission sets
The Core Package includes three permission sets. A fourth — the Integration User Permission Set — is created dynamically by the Setup Assistant and scoped to the objects you select.
| Permission Set | Who it's for |
|---|---|
| Poggio Setup User | The admin user who installs and configures the package via the Setup Assistant |
| Poggio Standard User | Non-system-admin users who need access to the Lightning component, custom objects, and metadata included in the package |
| Poggio Agent User | Users who need agent access to the Poggio objects and Invocable actions |
| Integration User Permission Set (created during setup) | Assigned to the dedicated Salesforce Integration User that Poggio authenticates as for the Inbound Connection |
Agentforce extension package
The Agentforce Extension Package adds a dedicated Agentforce subagent and actions that let sellers interact with Poggio directly from Agentforce.
Agentforce subagent
Poggio Account Intelligence Orchestration: Enables end-to-end creation, regeneration, enrichment, and querying of Poggio-powered account intelligence directly from Salesforce. Added to an Agentforce Employee Agent via the Asset Library during setup.
Agentforce actions
| Action | What it does |
|---|---|
| Create/Recreate Account POV in Poggio | Creates or refreshes a POV for an account. The agent takes the Account ID from the page context, sends it to Poggio, and displays the request status to the seller. POV generation is asynchronous, and results are written back to Salesforce when complete. |
| Create Account Plan with Poggio | Generates or updates an Account Plan along with Account Objectives and Contacts. The agent collects the relevant metadata and triggers plan generation via Poggio. |
| Ask Poggio Agent | Lets users ask natural-language questions about an account. The action calls out to the Poggio agent, which responds with grounded, POV-informed answers directly in the Agentforce chat. |
Installation and configuration
This section walks you through installation in the default Lightning Experience environment. You will be instructed to navigate through Setup repeatedly — click the gear in the upper right and select Setup, then use the Quick Find box to locate sections.
Prerequisites
Before installing, confirm the following are in place:
- Salesforce Enterprise Edition or higher
- Lightning Experience enabled
- System Administrator role or equivalent permissions
- A Poggio workspace with API access — your Poggio account team will provide the package install URL, subdomain, Client ID, and Client Secret
The package depends on two Salesforce features that must be turned on before installation:
- Einstein Generative AI — required so the package can access Salesforce's generative AI capabilities, which power the agent's ability to generate contextual, natural-language output. See Setting up Einstein Generative AI.
- Agentforce — required for the Agentforce Extension Package, which creates and configures custom agents that deliver content directly through the Agentforce interface. See Enabling Agentforce.
Step 1: Install the package
- Paste the package install URL provided by your Poggio account team into your browser's address bar and press Enter. If you are not already logged into the target org, Salesforce will prompt you to log in.
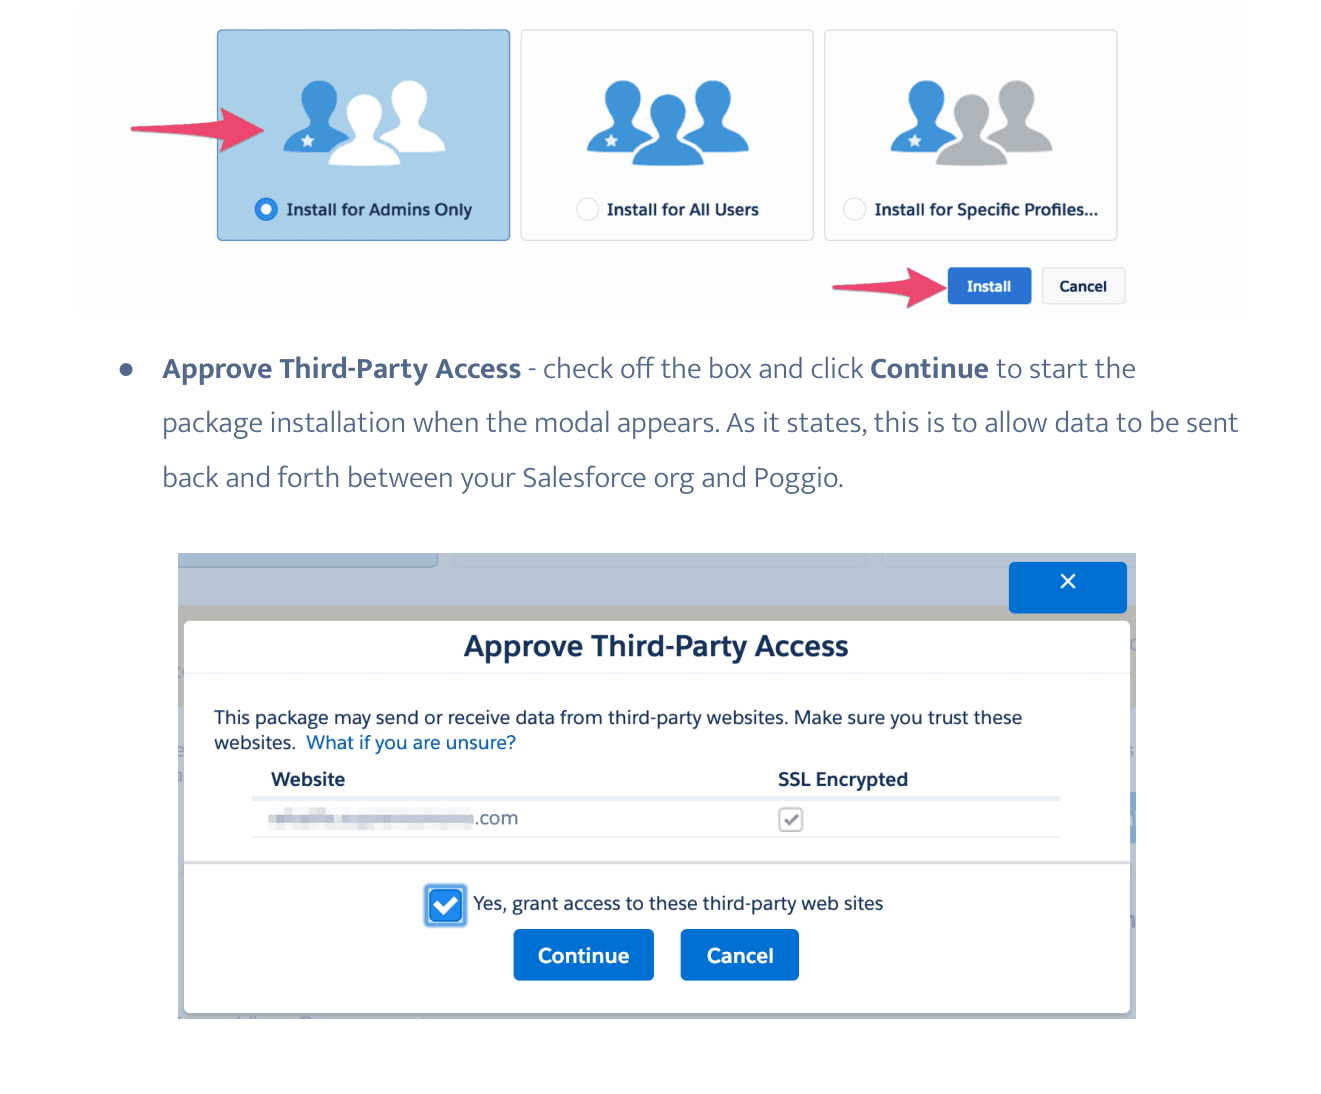
- Select Install for Admins Only. This is the recommended option — it lets you control access and permissions after the package has been installed. Click Install. For background, see Salesforce's Application Installation Guide.
- When the Approve Third-Party Access modal appears, check Yes, grant access to these third-party web sites and click Continue. This allows data to flow between your Salesforce org and Poggio.
If you are also using Agentforce, install the Agentforce Extension Package next using the same flow.
Step 2: Assign permission sets
Assign the packaged permission sets based on each user's role:
- Poggio Setup User — for the admin who will run the Setup Assistant
- Poggio Standard User — for sellers and managers who view Poggio data and use the flow actions
- Poggio Agent User — for users who need agent access to Poggio objects and Invocables
To assign:
- Navigate to Setup > Users > Permission Sets.
- Select the permission set, then click Manage Assignments > Add Assignment.
- Check the box next to the users you want to grant access to and click Next.
- Optionally set an expiration date, then click Assign.
For background, see Salesforce's documentation on Permission Sets.
Step 3: Run the Setup Assistant
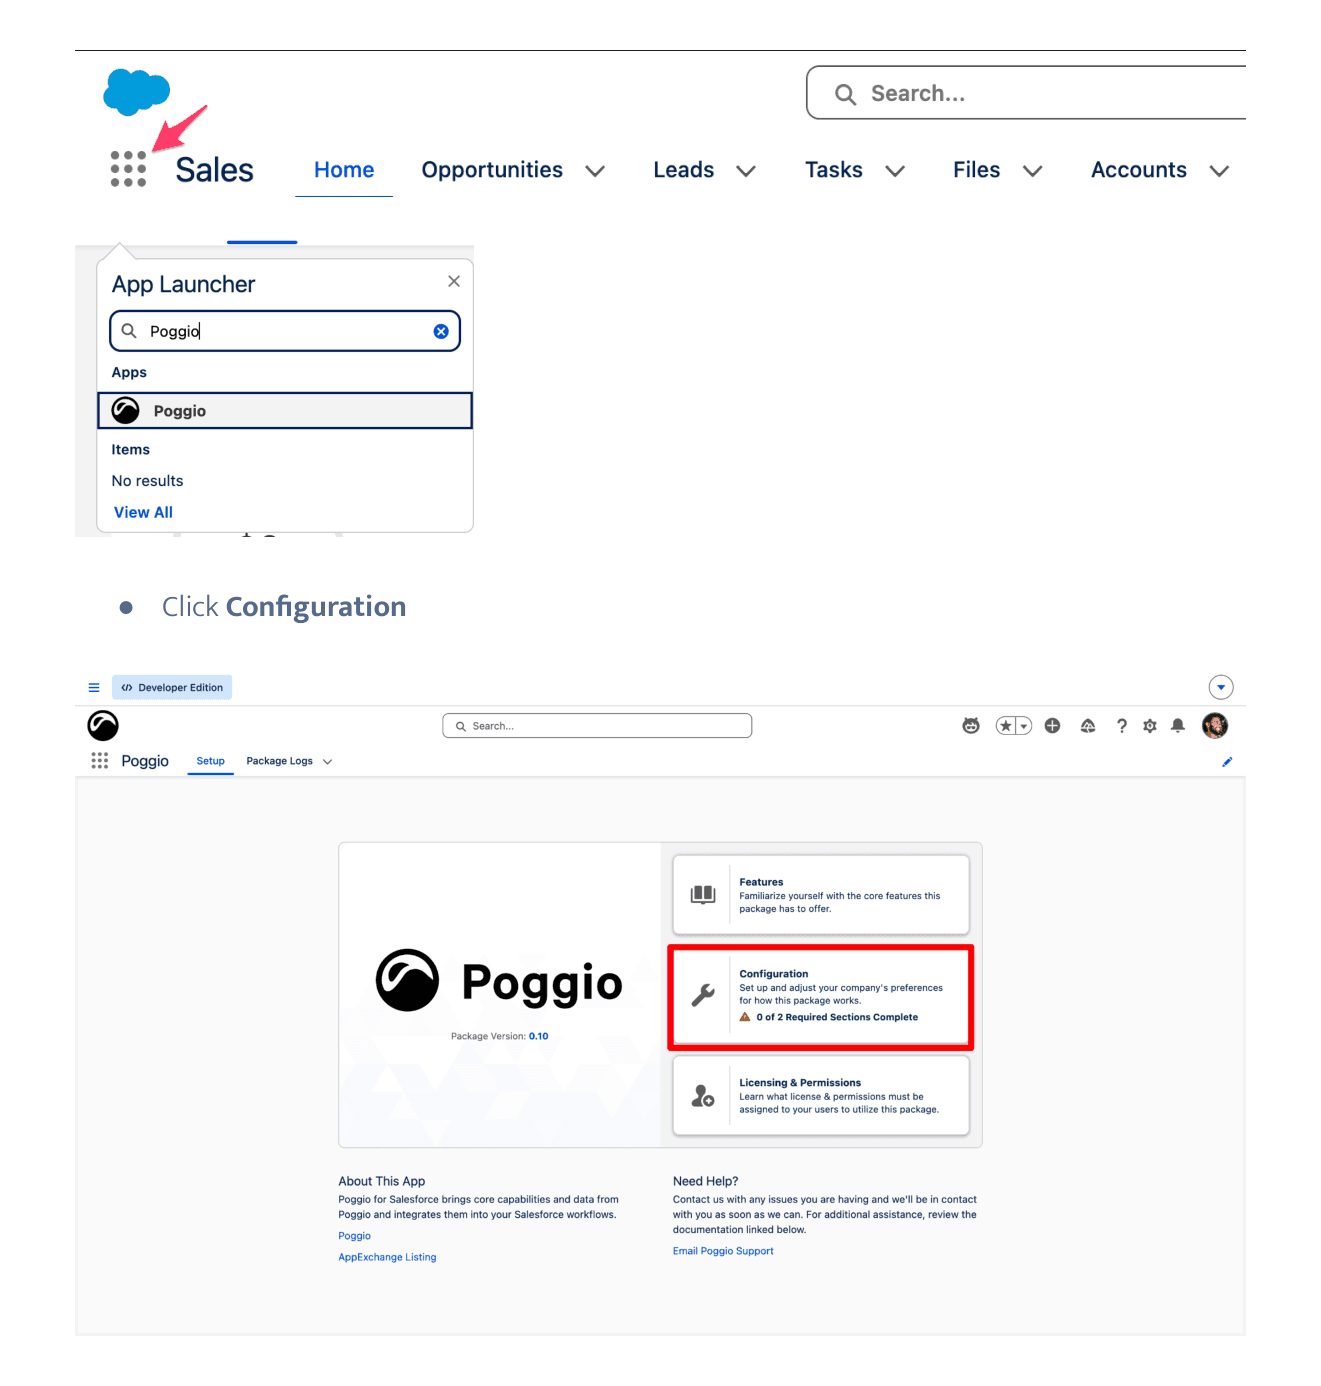
The Setup Assistant connects your Salesforce org to your Poggio workspace. Navigate to the App Launcher, search for Poggio, open the app, and click Configuration.
To avoid permission-related errors during setup, the admin running the Setup Assistant must have the following system permissions in addition to the Poggio Setup User permission set:
- Author Apex
- Customize Application
- View Roles and Role Hierarchy
- View Setup and Configuration
- Manage Users (this also adds related permissions)
- View All Profiles
Account Plan Object Configuration
Poggio generates AI-powered account plans by analyzing your Salesforce account data alongside Poggio's unified intelligence. From the Account Plan Selection picklist, select the object your org uses to manage Account Plan records.
System Connections
Open System Connections from the left panel. There are three sub-sections to configure, in order.
Domain Settings. Input the subdomain provided by your Poggio account team and click Activate.
Outbound Connection (Salesforce → Poggio). Enter the Client ID and Client Secret provided by your Poggio team and click Connect.

Inbound Connection (Poggio → Salesforce). This step requires a dedicated Salesforce Integration User. Using an API-only integration user improves security and auditability by separating automated access from human administrator accounts and limiting access to only what the integration needs. Salesforce provides 5 free integration user licenses for Enterprise Edition orgs and higher.
Click Connect in the Inbound Connection panel to begin, then complete each of the following sub-steps:
-
Set up the Integration User. Choose either:
- Create New User — populate the required fields (you can use the defaults or modify them) and click Save & Next. The new user will be created with the Minimum Access - API Only Integrations profile.
- Select Existing User — pick an existing integration user from the picklist and click Save & Next. Only users with the Minimum Access - API Only Integrations profile or the Salesforce API Integration permission set license can be selected from the user picklist.
-
Create & Assign the Integration User Permission Set. Add any objects you want to grant the integration user access to (for example, Account Plan), then click Save & Next. The Setup Assistant creates a new permission set named after your integration user and assigns it.
-
Configure the External Client App. The package includes an External Client App (ECA) that facilitates secure communication between Poggio and your Salesforce org. Click Open External Client App in the modal.
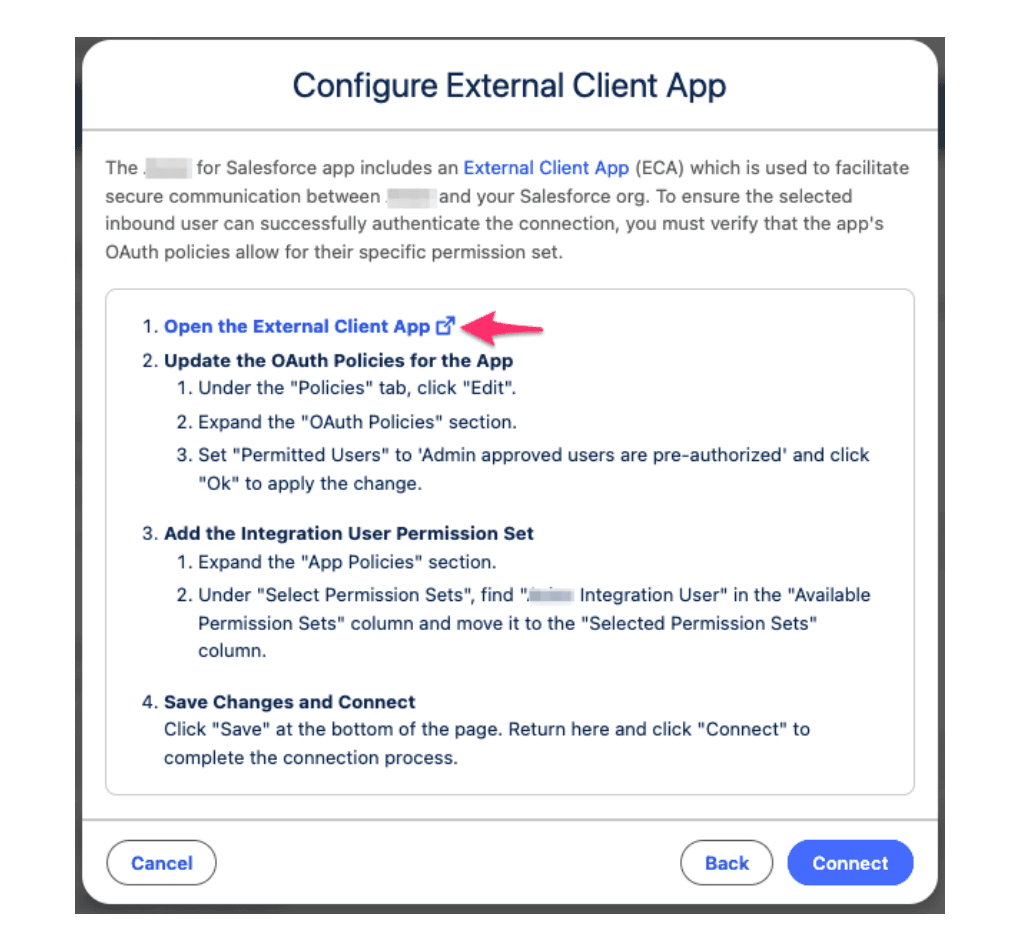
In the ECA configuration page:
-
Under the Policies tab, click Edit.
-
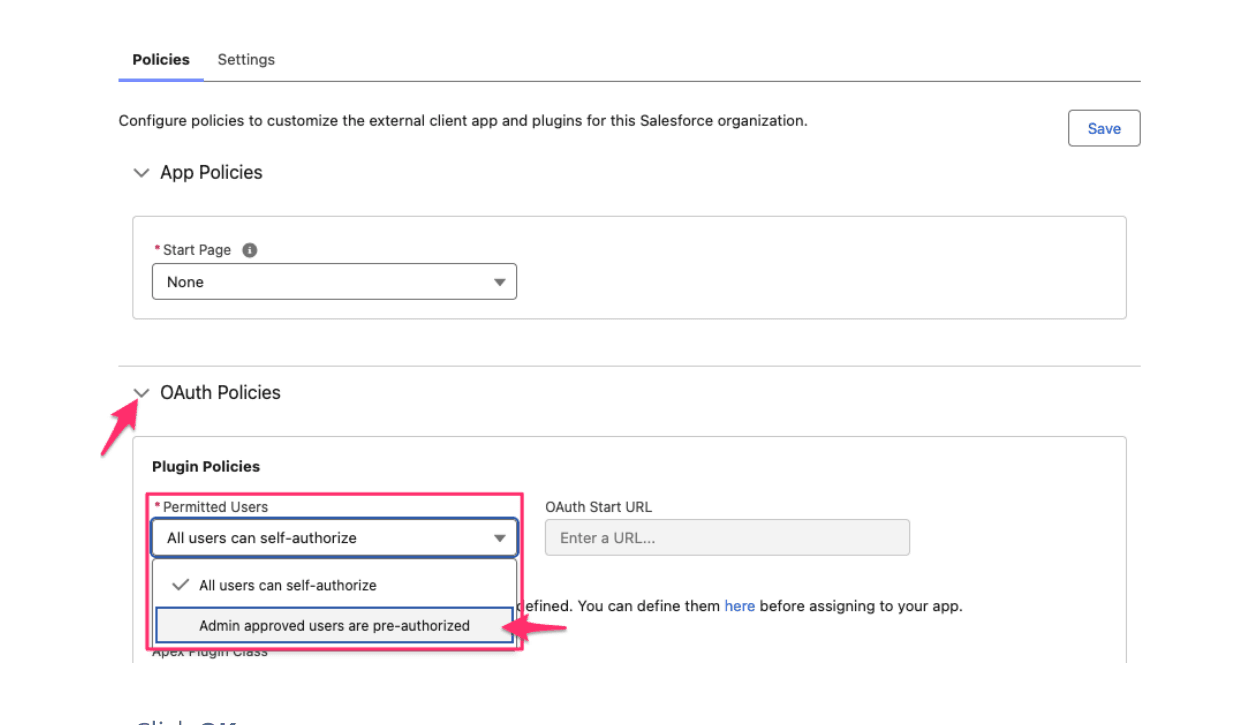
Expand OAuth Policies. Set Permitted Users to Admin approved users are pre-authorized and click OK on the confirmation dialog.
-
Expand App Policies. Under Select Permission Sets, find the Integration User permission set you just created in the Available Permission Sets column and move it to Selected Permission Sets.
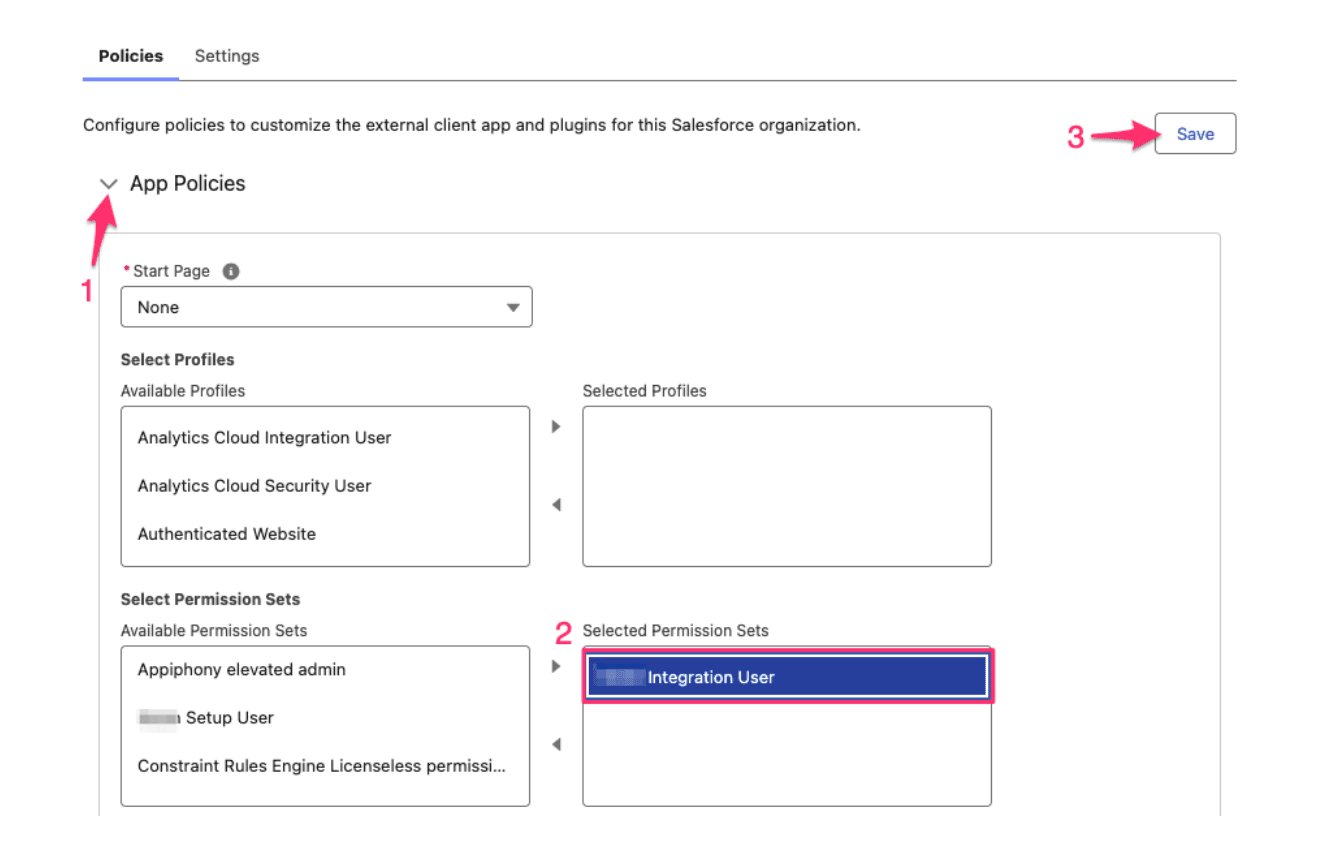
-
Click Save at the top of the page.
-
-
Return to the Poggio Setup Assistant and click Connect to finalize the inbound connection.
Agent Configuration
This step is visible once the Poggio Agentforce Extension Package has been installed. The extension package includes a pre-built Agentforce subagent called Poggio Account Intelligence Orchestration that you attach to an Agentforce Employee Agent.
-
Navigate to the Agentforce Agent Setup page and click New Agent.
-
Select an agent template — typically Agentforce Employee Agent — then click Next.
-
On Select your agent's subagents, deselect any included default actions you don't want, then click Next.
-
On Customize your agent, fill in the Name, API Name, Description, Role, and Company fields. Click Create.
-
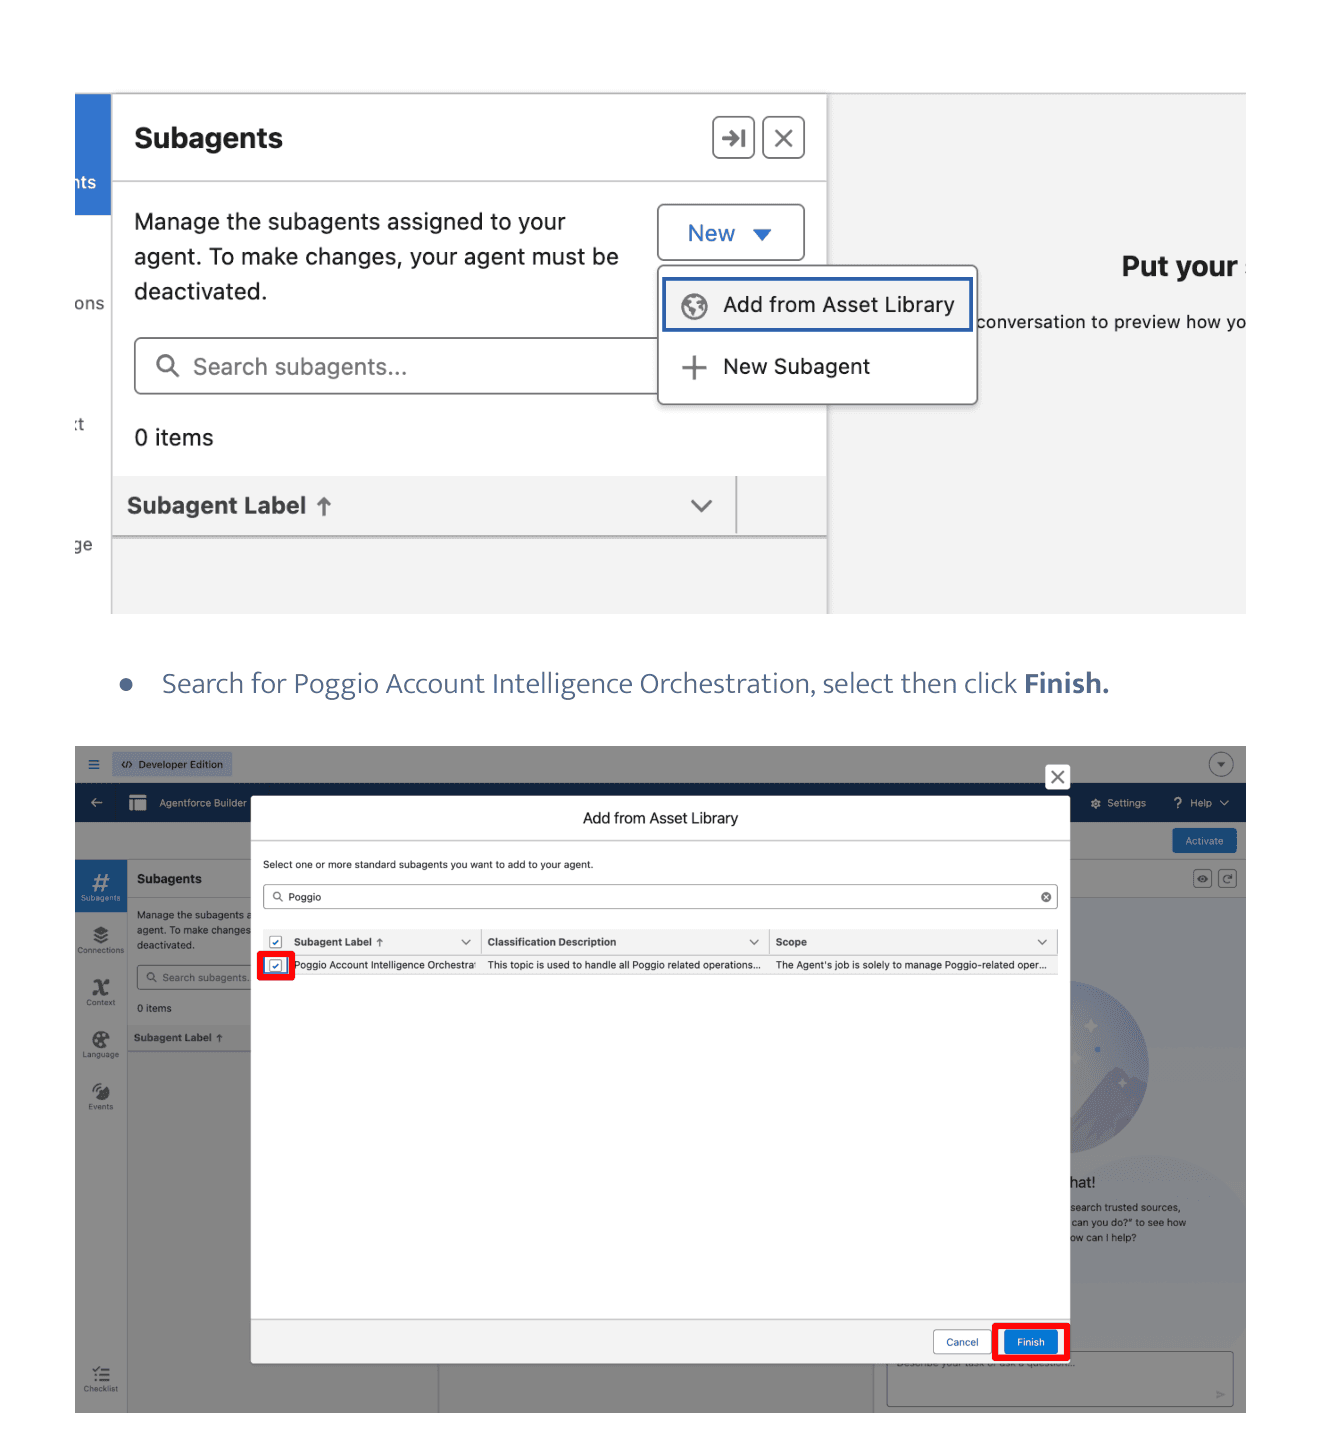
On the Agent Builder page, open the Subagents panel, click New > Add from Asset Library.
-
Search for Poggio Account Intelligence Orchestration, select it, and click Finish.
-
Click Activate, then Ignore & Activate on the confirmation dialog.
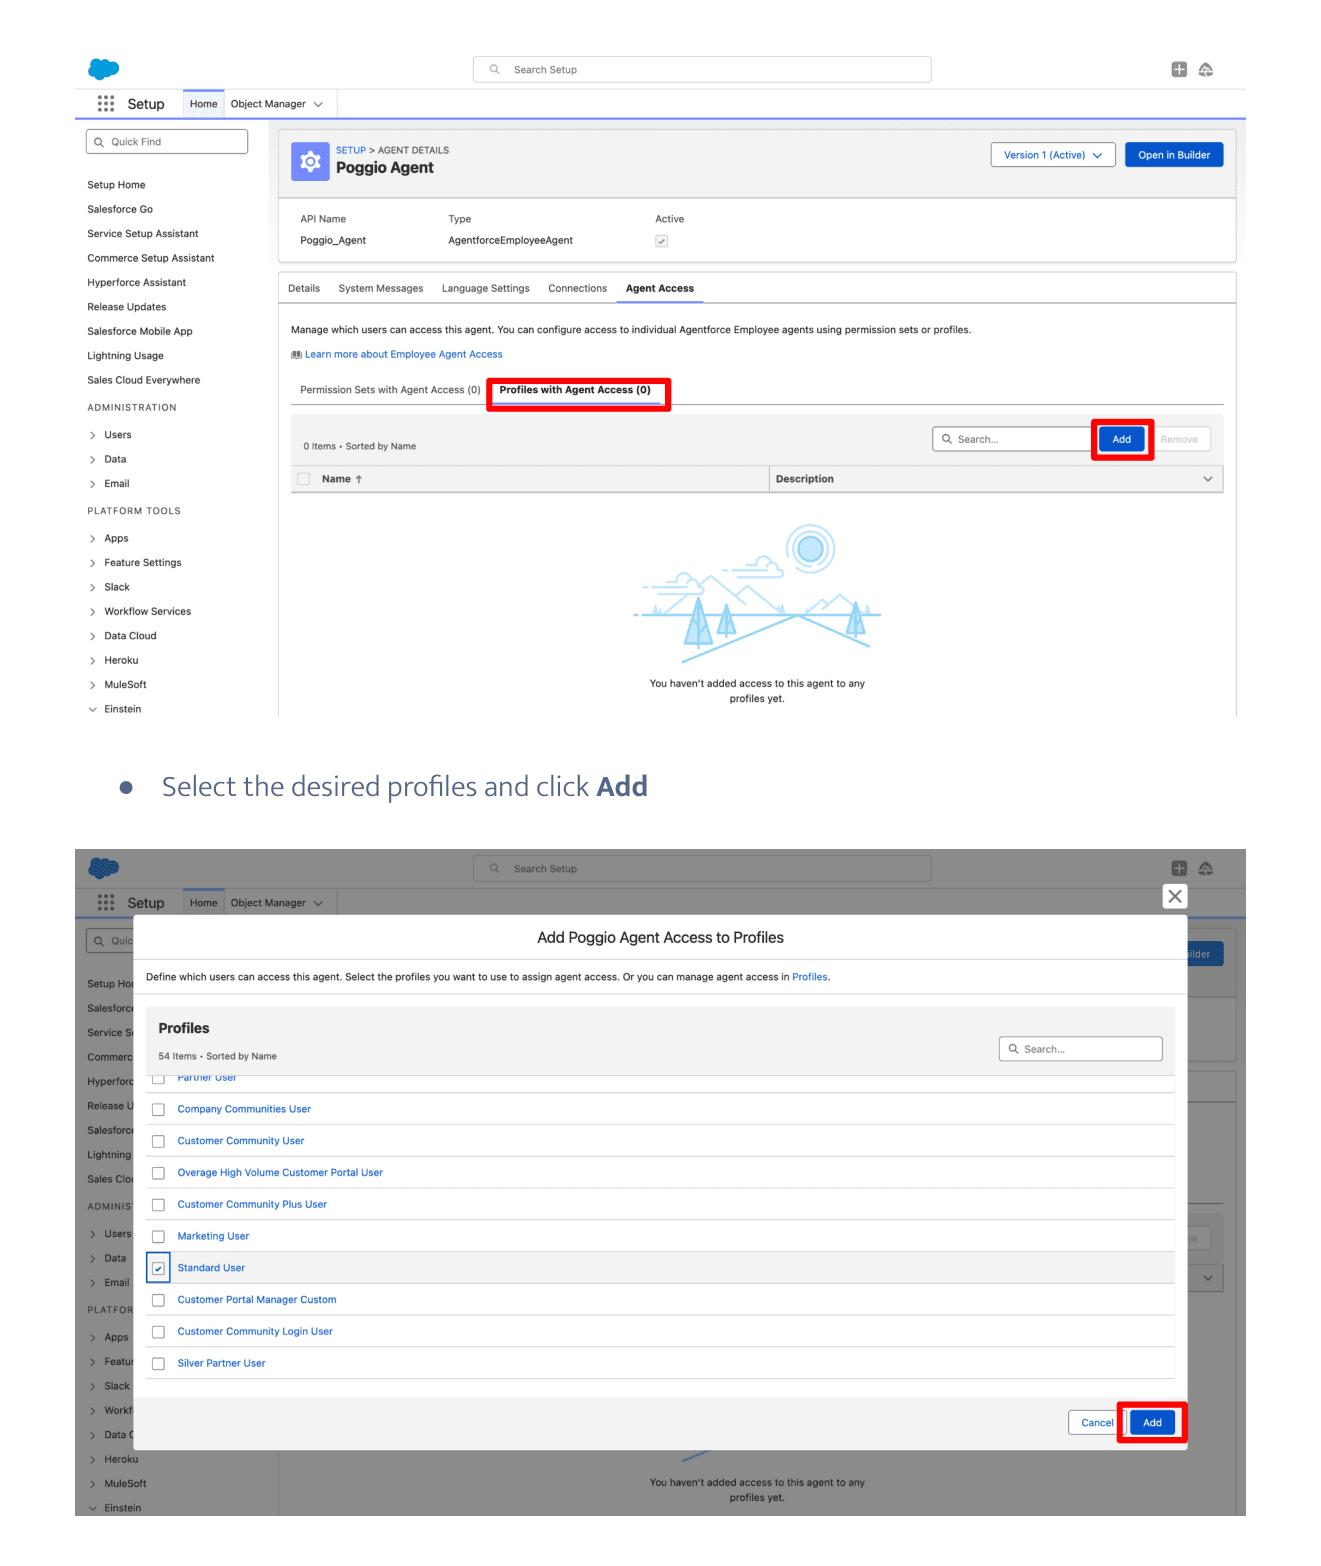
Then grant profiles access to the new agent:
- From the Agentforce Agents page, select your new agent and open the Agent Access tab.
- Select Profiles with Agent Access and click Add.
- Check the profiles that should have access to the agent and click Add.
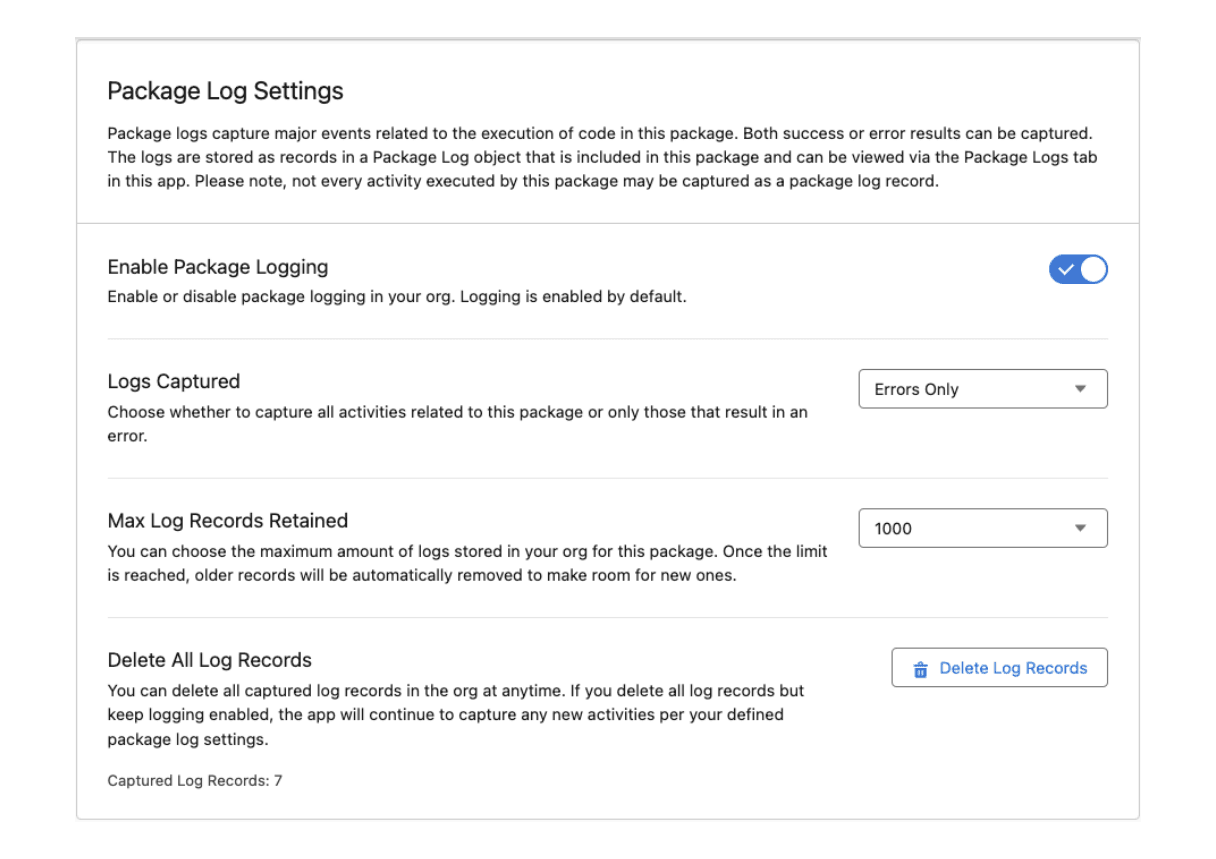
Package Log Settings
Open Package Log Settings from the left panel. Package logs capture major events related to the execution of code in the package and assist with debugging.
- Enable Package Logging is on by default. Toggle off to disable.
- Logs Captured — choose All Activity or Errors Only.
- Max Log Records Retained — choose 1,000 / 5,000 / 10,000. Older records are automatically removed when the limit is reached.
- Delete All Log Records — clear all captured logs at any time. If you delete logs but keep logging enabled, the package will continue capturing new activity per your settings.
Logs are stored on the Package Log custom object and viewable from the Package Logs tab in the Poggio app.
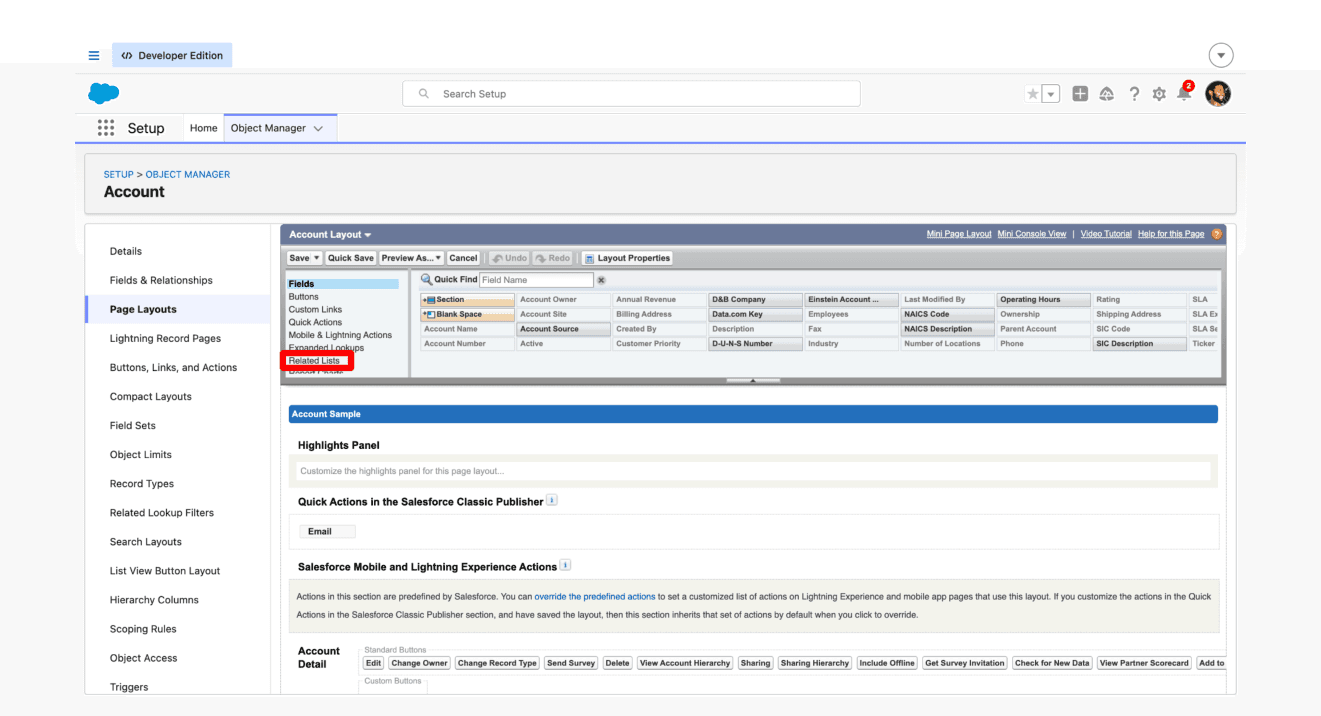
Step 4: Add Poggio related lists to Account page layouts
The Poggio Account Intel and Poggio Sync Request related lists are not added to Account page layouts automatically. To make POV data and sync status visible to sellers:
- From Setup, open Object Manager and select Account.
- Open Page Layouts and select the page layout you want to edit.
- Select Related Lists in the layout palette.
- Drag Poggio Account Intels and Poggio Sync Requests onto the layout. If Account Plans is not already on the layout, add it here as well.
- Click Save.
For background, see Create and Edit Page Layouts and Customize Page Layouts with the Enhanced Page Layout Editor.
Step 5: Configure or activate flow templates
The package includes three flow templates: Generate POV, Refresh Poggio Account Intel, and Generate Account Plan. You can activate them as-is or clone them to customize.
-
From Setup, search for Flows. The three Poggio flow templates appear with Package State set to Managed-Installed.
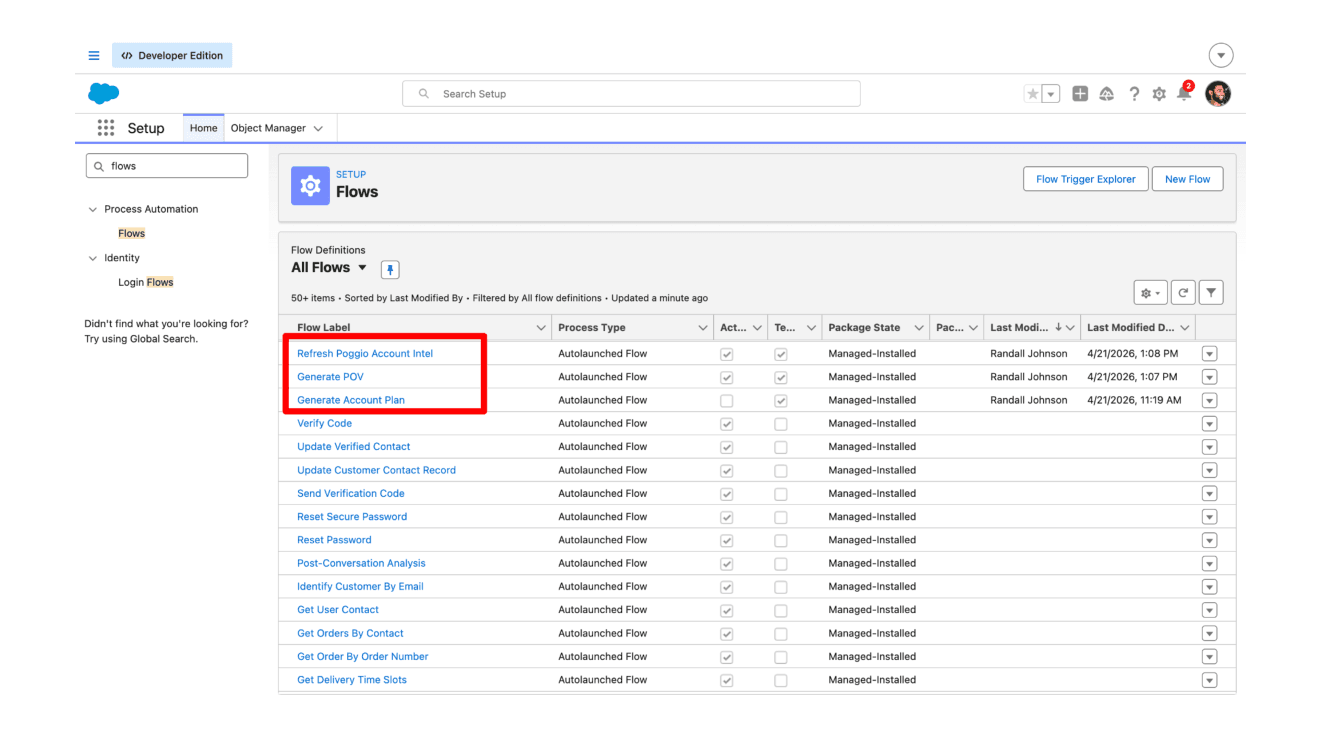
-
Open a template (for example, Generate Account Plan) to review the trigger conditions and actions.
-
If you need to change the trigger criteria, conditions, or downstream actions, click Save As New Flow to create an editable copy, make your changes, and click Activate.
-
If no changes are needed, the template can simply be activated.
For background, see Flows and Processes and the Trailhead module Build Flows with Flow Builder.
Support
If you encounter issues during installation or operation:
- Check the Package Logs tab in Salesforce for error details.
- Verify the System Connections section shows an authorized status.
- Confirm permission sets are correctly assigned.
- Contact support at support@poggio.io or through the support modal in your Poggio workspace.
Resources
Salesforce documentation referenced throughout this guide:
- Application Installation Guide: Installing Packages
- Salesforce Help: Installed Packages
- Salesforce Help: Permission Sets
- Salesforce Help: External Client Apps
- Salesforce Help: Activating Lightning Experience Record Pages
- Salesforce Help: Quick Actions
- Salesforce Help: Create and Edit Page Layouts
- Salesforce Help: Customize Page Layouts with the Enhanced Page Layout Editor
- Salesforce Help: Create Custom Fields
- Salesforce Help: Flows and Processes
- Trailhead: Build Flows with Flow Builder
- Salesforce Help: Agentforce and Einstein Generative AI
- Salesforce Help: Create an Agent from an Agentforce Employee Agent Template
- Salesforce Help: Manage Employee Agent Access
- Trailhead: Create Employee Agents in Agentforce